Sunday, June 6, 2010

The new site is here.

Hello all,

I'm officially retiring followabbie.blogspot.com.

To keep up with my photo adventures, update your bookmarks:

The new blog

http://abbieredmon.com/blog

Click to see this photo, and lots more!

Thursday, June 3, 2010

Still a lot to learn

Though I've just recounted everything I've learned in the past year, I feel it's important to mention the things that I hope to learn in the coming year, and beyond.

Among them:

1. How to use an external flash
a. As fill flash
b. For catchlights in the eyes
c. As the primary source of light
d. How to make flash not look like flash!
2. When to use filters, and which filters are most helpful in which situations
3. More post-processing techniques
4. More post-processing techniques
5. More post-processing techniques

....I think you get the drift :)

And lastly, and perhaps most importantly,

6. Continue to develop my "creative eye."

So that's it for followabbie.blogspot.com. Look for the link to the new blog in the next (and final) post!

Wednesday, June 2, 2010

What I've learned in 1 year

So, it's been a year since I started this blog, and I thought this would be a good time to reflect on what I've learned about my camera(s!) and about photography since then.

I'm hoping to write this post in a way that will help other beginning DSLR users who are as confused as I was about the manual settings of their cameras.

I remember that my biggest question when I was learning how to properly use the manual settings on my Canon 350D was what settings to change when. (Isn't that the only question? :))

I dumped myself right into the learning curve and started using M mode all the time -- never Av, and never Pv (I now use mostly Av).

So, what's the No. 1 thing I've learned?

It's all about light.

In that light (ha! punny!), I learned about my camera's settings as they relate to light:

1. I learned that a higher ISO (higher sensitivity) would "let in" more light (the change to the image would be an increase in noise).

(Photos below taken from this awesome write-up on POTN.)


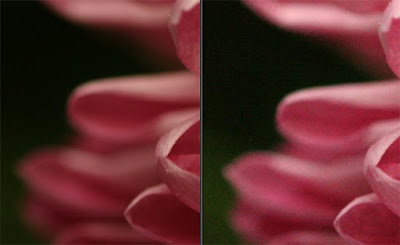
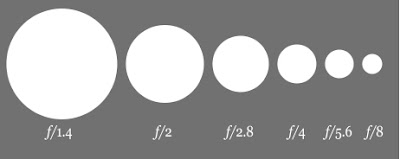
2. I learned that a lower f-stop number (larger opening) would let in more light (the change to the image would be a narrower DOF, which means that less of the image would be in focus).

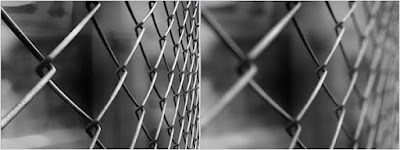
....and here, the photo on the left was taken with a high f-stop number (a smaller opening), and the photo on the right was taken with a low f-stop number (a larger opening). Less is in focus with a smaller f-stop number / larger opening:


3. I knew that a longer shutter speed lets in more light (and the change to the image would be, maybe, some motion blur [this would depend on how much it was lowered]).


(Photos above taken from this awesome write-up on POTN.)

But as a beginner, if I needed more light to capture a photo, I didn't know which of these settings I should change to get it.

My step 1
I learned two things:

1. ISO 100 is the base ISO (for most digital cameras), and I should use it whenever possible because it will give me the best image quality. Higher ISOs introduce digital noise into a photo (see photos of pink flower, above).

2. Unless I'm shooting a "still life" (literally), I'm using a tripod, or unless I want a special effect, a higher shutter speed is always preferable, because it will stop any motion in my subject, my background, or any motion due to my own hands shaking the camera accidentally. (Also, I now know that there is a formula of some kind for this -- shutter speed should never be less than something-times-the-focal-length-whatever -- but I've yet to memorize that formula or really put it to use. I just use as fast a shutter speed as I can.)

So -- for a simple, "normal" shot of a person or two, something interesting while traveling, &c., I should try to use ISO 100 and a high shutter speed.

My step 2
I was shooting in M mode, so my method would go like this:

1. Set ISO to 100 if sunny or bright. Set ISO to 200 or 400 if shady or indoors. (And 800 or 1600 if nighttime, very low light, &c.)
2. Set the f-stop to whatever I thought made sense for the shot. (I actually ignored f-stop for a while because I didn't know what it did, but I include it here for simplicity's sake.)
3. Move my top scroll bar (which controls shutter speed when in M mode) to the left or right to get the flashing line dead center on my exposure meter.
4. Take the shot!

Sometimes, I took the photo, but it was still too dark.

Sometimes, I scrolled for shutter speed until I couldn't scroll anymore, and the flashing line still wasn't in the center. This meant that my camera was unable to get the shutter speed necessary to get adequate light for that shot, considering the ISO and f-stop settings that I had chosen, OR, there was too much light reaching the sensor, and my camera couldn't use a fast enough shutter speed to get accurate exposure (my XT only went to 1/4000 sec.).

That's when I knew I needed to change a setting to let more light in to my sensor.

Step 3
To let in more light, my options are:

1. Lower the shutter speed (which would let in more light, and the change to the image would be, maybe, some motion blur [this would depend on how much it was lowered]).

This is a good option if the SS is already pretty high (1/4000, 1/2000, &c.). Again, some people cite the not-longer-than-X-times-focal-length rule here, but I can't ever remember that rule.

This is NOT a good option if your SS is already pretty low (unless you're going for a certain special effect, or unless you're shooting with a tripod, which I almost never do).

If you let your SS get too low, your image will look like this:


Yeah, I had enough light with this shutter speed, but this kind of photo is not exactly what I was going for :) This photo was taken with my 50mm at f/2.0, ISO 400, and a shutter speed of 1/13. Were I to retake this photo (excluding flash as an option), I would probably be wise to bump up my ISO as a first choice, at least to 800, and maybe to 1600. See Option #2 about ISO below for more details about this shot.

2. Raise the ISO (which would let in more light, and the change to the image would be an increase in noise)

This would introduce noise into my photo, but with my 350D, probably not noticeably until ISO 400, or in some cases, ISO 800.

This is a good option if I'm taking a hand-held photo of someone doing something and don't want to lessen the depth-of-field by lowering the f-stop number, like the image above.

In the example image in #1, I said that to improve the image and get less blur, I would likely bump my ISO to 800 or 1600 to let in more light but allow my aperture to remain the same. I say that because my aperture was already at 2.0 (this lens goes to 1.4), and if I opened it wider, my focus might look off since this is a shot of someone doing something, not just a portrait or a more artistic shot. If I just quickened the shutter speed without changing anything else, the photo would be less blurry, but it would also be far too underexposed, because nothing else (no other setting) would be compensating for the lesser amount of light reaching the sensor.

So, by bumping my ISO to 800, a faster shutter speed would allow me to get this image:


So, this image isn't perfect, but it's much better compared to the first, blurry one.

3. Lower my f-stop number (which would let in more light, and the change to the image would be a narrower DOF, which means that less of what I focus on would be in focus)

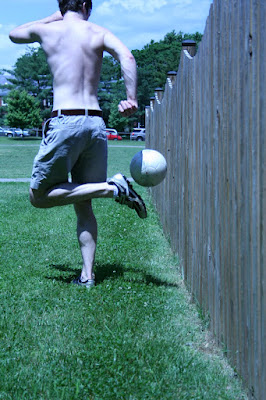
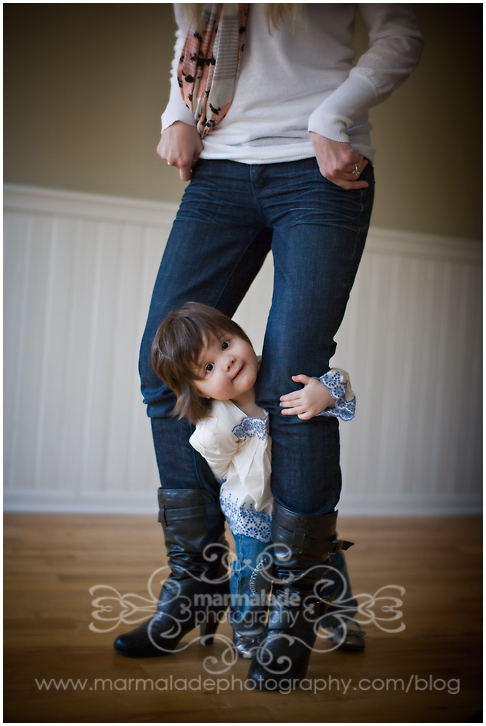
This is a good option if I'm taking a photo like the one below, and I had started at f/4 or something. By lowering it to f/2, I would lose almost nothing, but I would gain several steps of light. If focused correctly, the subject should still be in focus with that DOF.

This is a good option if I'm taking a more artistic kind of shot, and a narrower DOF would increase the interest of the image, like this image, which was taken with my 50mm at f/2:


This is NOT a good option if your f-stop number is already pretty low, and any lower would render important parts of your photo out of focus (because of the smaller DOF). This is also NOT a good option if you're taking a landscape shot, a shot of a group of people, or any other shot where you want almost everything to be in focus.

In sum
So I learned that the setting I should change depended on what I was taking a photo of, and how I wanted that photo to look. That may sound obvious, but I truly did not realize this when I was learning about my camera's settings. I wanted there to be a formula for the settings at all times -- change Q when X is Y and Z is A. But it doesn't work like that. I am slowly learning to let my naturally logical mind be more creative (an ongoing process, obviously).

I hope my explanation makes some sense, and maybe it will help someone else who is learning!

Other random things I've learned
A few other things I've learned about photography over the past year:

1. White balance. I learned not to forget about my white balance setting. Remember my third post on this blog? Here's another photo from that day:

I had my white balance set to "Fluorescent." FAIL! But what an excellent example of one of my photographic learning experiences.

I've actually grown accustomed to leaving it on "Auto White Balance" just in case I do forget about it (which I usually do), but AWB on my XT pretty much sucked. To put it bluntly. It was always wrong! Unless I was outside on a sunny day, I almost always had to change the WB in post-processing, which I can do easily since I now shoot almost exclusively in RAW. Speaking of...

2. Shooting in RAW. RAW files are much more easily manipulated in post-processing than JPEGs. You can eff up the exposure on a shot, but if you shot it in RAW, there's a good chance you can recover it, at least somewhat, in post-processing. Not that you should rely on post-processing to fix your shots instead of learning how to take them in the first place, but it's a nice plan B when you take a quick shot and then realize you forgot to change an important setting, for example.

3. How to clean my camera and lenses. I was afraid, for a while, to mess with the "guts" of my camera, or to do anything except change lenses. (I do keep my lens caps on religiously, though!) Two relatively large dust specs on my sensor encouraged me to learn how to properly clean inside my camera and how to really keep my glass clean. For my lenses, I have a lens pen and a microfiber cloth. For my 350D's and 5D's sensors, I have a small blower (used successfully two times!).

4. Post-processing skills. I downloaded the trial version of Lightroom several months ago, and, coupled with the fact that I shoot RAW now, my final images have increased in quality a lot. It's a blessing and a curse, though, because when the LR beta runs out, I'll be forced (yes, forced!) to actually purchase the software. I read briefly about the different processing softwares available and chose Lightroom almost haphazardly, but I've been very pleased. Most of the controls are pretty intuitive. I'm still discovering new tools that I didn't know the program had (and usually don't know how to use), so I am fairly certain that my skills won't outpace its abilities any time soon.

5. Still working on: Flash photography! The flash is fun to experiment with, and expect some shots using flash on the new blog. (Link to come.)

Fin.
Looking back on my first few posts to this blog, I can't help but be embarrassed about some of the mistakes I made. But then I remind myself that this is a learning process, and making mistakes is a huge part of learning -- and sometimes it's the only way to learn! I consider myself much better off having made those mistakes, and look forward (eep! do I?) to making more mistakes in the future. :)

Look for another post with a list of things I still need to learn...

Thursday, May 27, 2010

The new flash

So, the Speedlite 580 EX II arrived yesterday. Got a chance to mess with it today.

I'm amazed, intimidated, confused, and intrigued by it. WTF, flash photography?!

The screen at the back with all the buttons and icons --- no idea what anything does. I read here and there to set it to ETTL (no idea what that means), and I read here to use a shutter speed of 1/200 or 1/250 when in a small room so that the flash will be the main source of light, and it won't be overexposed due to ambient light. Plus, if there are more than two types of main light with such different color temperatures (tungsten = warm; flash = daylight), the shot won't look that great.

...actually, I'm just talking about out of my you-know-what, here; I have no idea what I'm doing! Trial and error, baby...

Here are my five experimental shots, with absolutely ZERO editing whatsoever, SOOC:

No flash, Av:


M, 1/250, Flash, aimed straight at subject:


M, 1/250, Flash, aimed straight up:


M, 1/250, Flash, aimed straight up with built-in bounce card out:


No flash, M, with the exact settings that I used for the flash:


Obviously, the shot with flash straight up and bounce card out is the most appealing one. Now I just have to learn the intricacies of it all. Shooting outside in daylight and using flash for fill will be a whoooole different animal.

(P.S. -- All shots here were at ISO 200, f/3.2. All but the first were with a shutter speed of 1/250. The first one (in Av) was at 1/8 of a second.)

I wanted to try also just taping a white index card to the back to use as a larger bounce card -- just to see how much of a difference the size makes. Next time.

Wow, flash. Never thought I'd be here! I'll get it eventually...

Sunday, May 23, 2010

Flash after all

Well, I've been doing a lot of reading, and I've decided that I need to have a good external flash in my bag if I want to shoot people. It's critical to have light on at least part of the face, and especially the eyes, and if Mother Nature won't do it, I'll have to.

Canon has some rebates going on through the beginning of July, and the Speedlite 580EX II is on there, so I ordered one yesterday. Then I'll just have to learn to use it!

Actually, a friend sent over a site that she reads that has some really awesome flash tutorials on it. I've already read a bunch of them, but I feel like the real learning will come when I have the flash on my camera and am experimenting with it. Trial and error is pretty much how I've done things so far -- flash will likely be no different.

I've avoided flash thus far because I was kind of afraid of it, and I thought it would be really difficult to learn. Well, it probably will be difficult, but I'm not as afraid of it anymore; I think it will open up some new possibilities that I'll be thankful for.

ad infinitum

Well, folks, good news: The new blog is almost ready.

Before I quit this site, I'm going to post a sort of "What I've Learned" blog post, since it's been exactly one year since I started this blog, and since I've really started trying to understand photography.

Until then, allow this little guy to hold you over:

Tuesday, May 11, 2010

The photography snob factor that I buy into

In learning photography, I have not managed to escape succumbing to a few of the snob factors that come along with it. There is a culture surrounding photography that can be alienating at times. Often, people focus on what lenses you have, if you have the latest & greatest body, or even what your strap says instead of on the photos you produce.

Generally, I have let these obsessions pass me by. If I own a lens with a "red ring," it's because I need (or want!) what that lens can do, not because I like what it looks like on the outside. (If anything, you will become more of a target to thieves with such blatantly expensive equip. -- no thank you!)

However, there is one snob factor that I have totally bought into without realizing it. What is it?

I never call them "pics," or even "pictures," really, preferring instead the more graceful-sounding "photos" or "images."

Yup, that's my sensitive spot: Terminology. Who would've guessed? It's seemingly the least important thing about photography altogether! Leave it to me to pick something random to be OCD about. I guess my love of words shines through in everything I do.

So there you have it. Wrap my L lens in newspaper and give me a Spongebob Squarepants camera strap -- I do not care. But call my photos "pics" and I will eat you for breakfast ;)

Saturday, May 8, 2010

New site coming soon

I've decided to buy a domain and move most of my photography-related doings over to the new URL (tbd).

The site will have lots of photos, but it will also link to a blog where I'll post along the same lines as I do here. I enjoy this process of documenting my learning. It is a little painful to look back on, though, as I realize everything that I was doing wrong as short as a couple of months ago!

Here's a little doggy for you to look at while you wait. (Don't worry, I'll continue to post here until the new site is up and running.) (Like anyone was worried. :))

Monday, May 3, 2010

LR presets, 135L

Played with the 135L some more over the weekend. Also tried out a few Lightroom presets while processing -- which I've recently learned about. Presets could be dangerous for me; I am still learning a lot about post processing... the last thing I need is a way for someone else to do it for me, and to do it better! But I'm hoping I'll be diligent enough to use them as learning tools. They are fun for now.

I mean, no one can deny that this lens has some delicious bokeh. The rest of this garden has blurred into a Creamy Green Backdrop of Heaven:


I am trying to get better at close-ups / "mini-scenes"... I find it difficult to make them interesting and captivating:


Here's a black & white of the graveyard at my friend's grandparents' property. It is a gorgeous place, very pastoral:


And here's an attempt at using one of my newly-acquired presets. This one was taken with the 50mm by my husband:


So, the presets are fun; I downloaded a bunch from Presets Heaven. When I have time, I'd love to work backwards from one of them and see how the effect was achieved so that I can recreate it myself! I want so badly to get better at processing. It's so important.

Conclusions: 135L is tastier than ever, but I am dyyying for a willing model to pose for me and stare deep into the glass so I can practice getting sharp headshots. Pretty please...

Thursday, April 29, 2010

What's my niche?

see also: Seeing (do I have a vision?)

A Tweet popped up on my feed today about the 7 Habits of Highly Effective Photographers -- the first one is: "They find a niche and they stick with it."

Now, it can't be a coincidence that lots of things I've been reading lately have to do with defining yourself as a photographer before you can really succeed. "Succeed," for most of my sources, refers to having a great career and establishing a name for yourself professionally, neither of which I am actively pursuing at the moment, but I am interested in figuring out what it is that I'm best at in the world of photography, and getting even better at that.

For starters, I know what I like to photograph:

1. People
2. Interesting (usually man-made) vistas, often with people in them
3. People

Sensing a theme?

Here are the kinds of photography I like to look at:

1. Portraits
2. Environmental portraits
3. Photojournalism

I think what I would like to do most is tell stories with my photographs. This feels like one of the most important things you can do with photography. I love stories. I love to hear people tell their stories, I love to watch people's stories played out through movies and plays, and I would love to be able to help tell others' stories through my photography.

New Resource!
Also saw this on Twitter today: books on photography by genre and focus. (Thanks, Nick Onken!) Now that I'll have some free time this summer to read for myself, I'm looking into what photography books might be helpful to me. This site is pretty straightforward, which I love. And very organized.

I might pick up one from "Photojournalism," one from "Street," and one or two from "People" -- #5 looks good here: "Photographing People: at Home and Around the World" by Andre Gallant. I could probably stand to pick up one on how to light people, as well.

But I try not to underestimate the value of hands-on experimentation, so I also plan to shoot lots this summer. To shoot lots of people ;)

Sunday, April 25, 2010

First Canon L: 135mm

Well, the 135L was delivered Friday, but when I got home, I had no one to shoot! My husband was off celebrating a friend's birthday, so I was left to my own devices to test out the new glass. I took a walk around the neighborhood and took some photos of squirrels and people taking their dogs for walks, but none of that was interesting. So yesterday, we had some friends over, and I got the chance to shoot people (hooray!).


My friend M. exercising my XT:


And okay, so this last one isn't a person, but whatever :)


There's some funky resizing stuff that's making the photos look not-as-awesome as they look on my computer -- I really need to learn how to "resize for the web." Should probably put that next on the to-do list.

I like the lens a lot. More chances this weekend to get some yummy portraits.

Wednesday, April 21, 2010

the elusive histogram | the photographer's life cycle

You know the one I mean. If your photo has failed, all the pretty colors are jammed up against the left side. If it's succeeded, things are a little more spread out, and usually further toward the right.

I've heard the slogan: Expose to the right!

I wasn't really sure what that meant when I first heard it. I then proceeded to learn the basics (blown highlights, too-dark shadows, dynamic range, &c.), but I still didn't really understand the histogram and what it was telling me.

Well, someone I follow on Twitter recently posted this link, and the article (and related articles) is an extremely helpful explanation of the histogram in Lightroom specifically (and the Tone Curve), which is awesome, because I use LR. I am probably going to reread this article, specifically when I edit my next batch of photos, whenever that might be. (I could re-edit old ones and give the knowledge a go tonight, but I am too tired for this.)

I am not too tired, however, to also share this with you, from this site:


I know it's hard to read, but one of the funniest parts is at the beginning of the blue line, where you think you're awesome because your flower photos and cat photos turn out well. Been there! (Though in my defense I didn't think I was awesome, I just thought I had taken a couple of pretty good photos. Sigh.)

I don't plan on falling into "the HDR hole," but maybe that's because I don't have a tripod yet ;)

"Gearfaggotry" is an interesting stop along the way, too, haha. I have also definitely been there. Actually still climbing out of that hole, though I've stopped obsessively reading forums about lenses.

Otherwise, I'm not sure where I fall on this chart. But wherever I am, I suppose I can look forward to that long fall down the blue line to "Dammit, I suck." One step at a time ;)

Sunday, April 18, 2010

illadelph street photos

Our day and a half in Philadelphia went by quickly, but we saw a lot! I actually fell in love with the city -- full of stylish people, interesting & colorful streets, very neat attractions, and lots of charm, culture, and personality!

Here are some of my favorite shots. First we had breakfast in Reading Terminal Market. This was taken with my 50mm:

The man had some nice jams :) Also with the 50:


Here are two from Rittenhouse Square. Both were taken with my 85mm:


Of course, we toured Independence Hall (with the 50mm):


And there are a lot more, but I suppose these really are my favorites.

I was actually really pleased with how most of my photos turned out. Often when traveling, I am sometimes rushed, or anxious, or flustered, and I forget about some important settings, or don't bother to check the photos to make sure they turned out. Of course I had some of those this time, too, but most turned out as I expected them to. I consider that a win! and an improvement.

I was excited to explore a new city with my (still) new 5D. I do see a quality difference in the photos (compared to those taken with my 350D), and also a sort of "atmospheric" difference -- especially in the shot of the man in the market (first shot above) and the one of the guitar player in Rittenhouse Square. I am still very pleased with the performance of this camera. And actually, I didn't get that tired carrying around the extra-heavy cam all day on Saturday. I'm still really glad I made the decision to get the used 5D.

One interesting thing I noticed is this: I think I'd get more out of a 24mm than a 35mm -- I noticed when walking around the city (with tall buildings, narrow streets, &c.), and inside restaurants or other small shops, that I almost constantly needed a much wider angle. That is actually a good thing, because now maybe I'll move the 24L up on my wish list, ahead of the 35mm. I am kind of waiting for Canon to update the 35mm anyway, so it's not a bad thing. It is not so good, though, that the 24L is still $1700! I'll likely still be holding off on that purchase for a while.

A fun weekend!

Wednesday, April 14, 2010

Case Study: B&W vs. Color

This is one from the middle of March -- one of the first few nice days of spring we saw. It was taken with my 85mm:


When I first edited this image, I left it in color, which looks like this:

I like the image okay in color, but I think a black & white treatment unifies the four kids and makes the image look more cohesive. I also think it makes it look more timeless. Fortunately, three out of the four kids are wearing lots of white/light colors, so they stand out even with the b&w conversion, which is nice.

Bummers in general:
1. It's a bummer that the boy on the left is behind the bar.
2. It's a bummer that there are such harsh shadows.
3. It's a bummer that I shot it at f/4 instead of f/8, or something more appropriate.

One last note -- I cropped the image to 16:9, which I think works really well for this composition.
I think the two trees framing the scene are nice, too.

Tuesday, April 13, 2010

Flowers in great light

Here are few from a couple of weeks back. Spring had just sprung, and I was practically worshiping the sun and the budding flowers...


I like the first one of yellow flowers better; they're facing the viewer, so it's a more welcoming shot. The isolation of this one by itself is nice, though.


This was late-afternoon, and I almost couldn't believe the light, especially on that last one. It looks artificial! I should frame that one instead of the white flowers against blue sky from my post the other day! The one thing I don't like about the third one is my focal point. I wish I'd focused on the top-most part of the flowers. Bummer. But still, it's such a moody shot for a flower picture. I like it.

We're going on a mini-trip to Philadelphia this weekend (a day trip, really), so I'm excited about what I might find there!

Friday, April 9, 2010

Using natural light

A couple of posts ago I promised to find some photographers who shot exclusively with natural light. Well, not only did I find a few, but I also found some good tips on how to use natural light effectively for portraits.

I found Marmalade Photography, and they prove you can do a lot with natural light:


I also found Lauri Baker organic imagery, who does some fabulous black and whites.

I found Audrey Woulard, who can do some amazing things with light! Proof:


And then I found Beth Lofgren Photography, where Beth from Tennessee captures very natural-looking (and naturally lit!) scenes... and gracefully! See:

I am encouraged.

I think I can get away with this if I learn to always stay very aware of where the light is coming from, and how much is coming from where. I also wouldn't be opposed to acquiring (or creating home-made) a couple of reflectors to take along every once in a while.

It also seems to be all about placing your subject in the ideal location -- which isn't always possible, especially with candids, but it's something to think about when choosing my own seat at an event, or when wandering around, wondering where to stand. Stand in the place where the light will work for you and for your photos!

I see lots and lots of practice in my future!

Note: No photos in this post are mine; see corresponding links!

Frame 'em!

I think I might print these up to frame and hang them as a series in the bedroom. I dream of one day having white, country-French bedroom furniture. I would love these photos in a room like that.


Now the question is: What color frame? (Or, a frameless frame?)

Wednesday, April 7, 2010

My own family photojournalism

I haven't forgotten the inspiration I got from The Family Photojournalist -- here are a few frames I took at my in-laws' house over Easter. This is our nephew...

...at dinner:
...on his way to take a bath:
...post-bath time:
...and playing before bed:
I realize I broke a few "rules" by not including a ton of background in these (some are actually even cropped). Hopefully I'll have a lot more opportunities to try my hand at this kind of style.

Other things on my mind lately: How do I really feel about learning flash/lighting techniques? For some reason I'm reluctant to learn. I know I can't always get the best photo with natural light, but I can try, right?

Something to research: Find a few photographers who work exclusively with natural light.

P.S. All the photos in this post were taken with natural light (or just the lights on in the room).

Sunday, March 28, 2010

Birthday post! (& storytelling)

I turned 25 on Friday. It was a fun weekend with friends and food and lots of cake and outside time!

Here is an attempt at a birthday photo series, in practicing for future photojournalism projects that I hope to have time to try this summer.


The end!

I don't think I chose a good focus point on the letter candles in the first one. I believe I focused on the "Y" in "Happy," which doesn't make a lot of sense now that I think about it.

Anyway, I have several photo projects in mind that I'd like to try soon. Unfortunately, they all require travel. They're not all travel projects, but two would have to be done in different cities (my grandmother's house, my father-in-law's).

I want to start developing a style and a focus in my photography. I like stories, which is why I'm interested in photojournalism and photo series. I'm sure there a lot of stories hovering around me all of the time -- it's drawing them out that I need to work on.

I do find it a bit intimidating asking people if I can tell their story through photos -- even friends and family members. I feel like I'd be intruding. I wonder how "professional" photojournalists approach their projects. I always assumed it was easier for them because they received assignments from magazines or places that they worked for, and they usually traveled to get their stories, and for some reason that seemed easier to me. But I guess everybody has to start somewhere, and whether you travel or not, part of "getting the story" is becoming engaged in it.

I'm sure PJs don't get the whole story in one day. I would love to hear more about that process. I have found one or two PJ blogs, but I think I should look for some more.

As they say, though, learning is doing. I should give one of my own ideas a shot.