Showing posts with label photography. Show all posts

Wednesday, June 2, 2010

What I've learned in 1 year

So, it's been a year since I started this blog, and I thought this would be a good time to reflect on what I've learned about my camera(s!) and about photography since then.

I'm hoping to write this post in a way that will help other beginning DSLR users who are as confused as I was about the manual settings of their cameras.

I remember that my biggest question when I was learning how to properly use the manual settings on my Canon 350D was what settings to change when. (Isn't that the only question? :))

I dumped myself right into the learning curve and started using M mode all the time -- never Av, and never Pv (I now use mostly Av).

So, what's the No. 1 thing I've learned?

It's all about light.

In that light (ha! punny!), I learned about my camera's settings as they relate to light:

1. I learned that a higher ISO (higher sensitivity) would "let in" more light (the change to the image would be an increase in noise).

(Photos below taken from this awesome write-up on POTN.)


2. I learned that a lower f-stop number (larger opening) would let in more light (the change to the image would be a narrower DOF, which means that less of the image would be in focus).

....and here, the photo on the left was taken with a high f-stop number (a smaller opening), and the photo on the right was taken with a low f-stop number (a larger opening). Less is in focus with a smaller f-stop number / larger opening:


3. I knew that a longer shutter speed lets in more light (and the change to the image would be, maybe, some motion blur [this would depend on how much it was lowered]).


(Photos above taken from this awesome write-up on POTN.)

But as a beginner, if I needed more light to capture a photo, I didn't know which of these settings I should change to get it.

My step 1
I learned two things:

1. ISO 100 is the base ISO (for most digital cameras), and I should use it whenever possible because it will give me the best image quality. Higher ISOs introduce digital noise into a photo (see photos of pink flower, above).

2. Unless I'm shooting a "still life" (literally), I'm using a tripod, or unless I want a special effect, a higher shutter speed is always preferable, because it will stop any motion in my subject, my background, or any motion due to my own hands shaking the camera accidentally. (Also, I now know that there is a formula of some kind for this -- shutter speed should never be less than something-times-the-focal-length-whatever -- but I've yet to memorize that formula or really put it to use. I just use as fast a shutter speed as I can.)

So -- for a simple, "normal" shot of a person or two, something interesting while traveling, &c., I should try to use ISO 100 and a high shutter speed.

My step 2
I was shooting in M mode, so my method would go like this:

1. Set ISO to 100 if sunny or bright. Set ISO to 200 or 400 if shady or indoors. (And 800 or 1600 if nighttime, very low light, &c.)
2. Set the f-stop to whatever I thought made sense for the shot. (I actually ignored f-stop for a while because I didn't know what it did, but I include it here for simplicity's sake.)
3. Move my top scroll bar (which controls shutter speed when in M mode) to the left or right to get the flashing line dead center on my exposure meter.
4. Take the shot!

Sometimes, I took the photo, but it was still too dark.

Sometimes, I scrolled for shutter speed until I couldn't scroll anymore, and the flashing line still wasn't in the center. This meant that my camera was unable to get the shutter speed necessary to get adequate light for that shot, considering the ISO and f-stop settings that I had chosen, OR, there was too much light reaching the sensor, and my camera couldn't use a fast enough shutter speed to get accurate exposure (my XT only went to 1/4000 sec.).

That's when I knew I needed to change a setting to let more light in to my sensor.

Step 3
To let in more light, my options are:

1. Lower the shutter speed (which would let in more light, and the change to the image would be, maybe, some motion blur [this would depend on how much it was lowered]).

This is a good option if the SS is already pretty high (1/4000, 1/2000, &c.). Again, some people cite the not-longer-than-X-times-focal-length rule here, but I can't ever remember that rule.

This is NOT a good option if your SS is already pretty low (unless you're going for a certain special effect, or unless you're shooting with a tripod, which I almost never do).

If you let your SS get too low, your image will look like this:


Yeah, I had enough light with this shutter speed, but this kind of photo is not exactly what I was going for :) This photo was taken with my 50mm at f/2.0, ISO 400, and a shutter speed of 1/13. Were I to retake this photo (excluding flash as an option), I would probably be wise to bump up my ISO as a first choice, at least to 800, and maybe to 1600. See Option #2 about ISO below for more details about this shot.

2. Raise the ISO (which would let in more light, and the change to the image would be an increase in noise)

This would introduce noise into my photo, but with my 350D, probably not noticeably until ISO 400, or in some cases, ISO 800.

This is a good option if I'm taking a hand-held photo of someone doing something and don't want to lessen the depth-of-field by lowering the f-stop number, like the image above.

In the example image in #1, I said that to improve the image and get less blur, I would likely bump my ISO to 800 or 1600 to let in more light but allow my aperture to remain the same. I say that because my aperture was already at 2.0 (this lens goes to 1.4), and if I opened it wider, my focus might look off since this is a shot of someone doing something, not just a portrait or a more artistic shot. If I just quickened the shutter speed without changing anything else, the photo would be less blurry, but it would also be far too underexposed, because nothing else (no other setting) would be compensating for the lesser amount of light reaching the sensor.

So, by bumping my ISO to 800, a faster shutter speed would allow me to get this image:


So, this image isn't perfect, but it's much better compared to the first, blurry one.

3. Lower my f-stop number (which would let in more light, and the change to the image would be a narrower DOF, which means that less of what I focus on would be in focus)

This is a good option if I'm taking a photo like the one below, and I had started at f/4 or something. By lowering it to f/2, I would lose almost nothing, but I would gain several steps of light. If focused correctly, the subject should still be in focus with that DOF.

This is a good option if I'm taking a more artistic kind of shot, and a narrower DOF would increase the interest of the image, like this image, which was taken with my 50mm at f/2:


This is NOT a good option if your f-stop number is already pretty low, and any lower would render important parts of your photo out of focus (because of the smaller DOF). This is also NOT a good option if you're taking a landscape shot, a shot of a group of people, or any other shot where you want almost everything to be in focus.

In sum
So I learned that the setting I should change depended on what I was taking a photo of, and how I wanted that photo to look. That may sound obvious, but I truly did not realize this when I was learning about my camera's settings. I wanted there to be a formula for the settings at all times -- change Q when X is Y and Z is A. But it doesn't work like that. I am slowly learning to let my naturally logical mind be more creative (an ongoing process, obviously).

I hope my explanation makes some sense, and maybe it will help someone else who is learning!

Other random things I've learned
A few other things I've learned about photography over the past year:

1. White balance. I learned not to forget about my white balance setting. Remember my third post on this blog? Here's another photo from that day:

I had my white balance set to "Fluorescent." FAIL! But what an excellent example of one of my photographic learning experiences.

I've actually grown accustomed to leaving it on "Auto White Balance" just in case I do forget about it (which I usually do), but AWB on my XT pretty much sucked. To put it bluntly. It was always wrong! Unless I was outside on a sunny day, I almost always had to change the WB in post-processing, which I can do easily since I now shoot almost exclusively in RAW. Speaking of...

2. Shooting in RAW. RAW files are much more easily manipulated in post-processing than JPEGs. You can eff up the exposure on a shot, but if you shot it in RAW, there's a good chance you can recover it, at least somewhat, in post-processing. Not that you should rely on post-processing to fix your shots instead of learning how to take them in the first place, but it's a nice plan B when you take a quick shot and then realize you forgot to change an important setting, for example.

3. How to clean my camera and lenses. I was afraid, for a while, to mess with the "guts" of my camera, or to do anything except change lenses. (I do keep my lens caps on religiously, though!) Two relatively large dust specs on my sensor encouraged me to learn how to properly clean inside my camera and how to really keep my glass clean. For my lenses, I have a lens pen and a microfiber cloth. For my 350D's and 5D's sensors, I have a small blower (used successfully two times!).

4. Post-processing skills. I downloaded the trial version of Lightroom several months ago, and, coupled with the fact that I shoot RAW now, my final images have increased in quality a lot. It's a blessing and a curse, though, because when the LR beta runs out, I'll be forced (yes, forced!) to actually purchase the software. I read briefly about the different processing softwares available and chose Lightroom almost haphazardly, but I've been very pleased. Most of the controls are pretty intuitive. I'm still discovering new tools that I didn't know the program had (and usually don't know how to use), so I am fairly certain that my skills won't outpace its abilities any time soon.

5. Still working on: Flash photography! The flash is fun to experiment with, and expect some shots using flash on the new blog. (Link to come.)

Fin.
Looking back on my first few posts to this blog, I can't help but be embarrassed about some of the mistakes I made. But then I remind myself that this is a learning process, and making mistakes is a huge part of learning -- and sometimes it's the only way to learn! I consider myself much better off having made those mistakes, and look forward (eep! do I?) to making more mistakes in the future. :)

Look for another post with a list of things I still need to learn...

Wednesday, March 3, 2010

Experiment: Desaturation

Barry Hannah died on Monday. I was home alone last night and decided to try a few experiments with desaturation -- something I've been wanting to try for a while after being inspired by a few things here and there, and most recently, by Chris Hunt.

For these, in Lightroom, I took the saturation down to -48 or so, upped the color temperature a bit (warmer), and played with the saturation of the oranges, yellows and reds to find the right mix of desaturation and warmth.

In this one, I heavily re-saturated the blue and yellow tones to emphasize Barry Hannah's tome -- Airships. I thought that that, paired with the shallow DOF on his name, might make it stand out, maybe as a kind of ode.

Here's the image:


I rather liked the way it turned out. The only thing I'm not sure about is if it looks too dark.

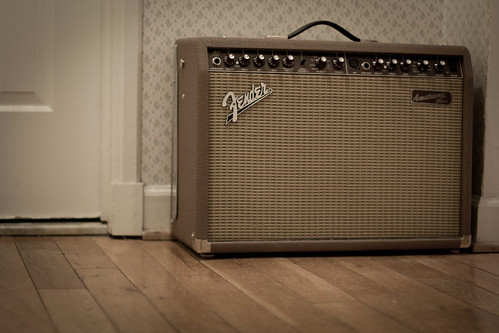
I tried another one with my husband's amp. It sits in our incredibly 70s-ish hallway (thanks to the wallpaper, among other things), so I also gave it some fairly heavy vignetting in post-processing to try to convey that vintage feel. Again, I'm not sure if it looks too dark:


I could probably have stood to brighten it a bit. Maybe I'll try that and repost later.

Otherwise, I like the results.

I am also curious to try out this treatment with photos that were taken outside on bright, sunny days. If our weather keeps on as it's been going, though, I might have to wait a while for a chance at that!

Saturday, February 27, 2010

5D classic

Have these two photos from yesterday morning. Tried out a used 5D at Caribou Coffee, and when I got home to look at my test photos, I thought these two were actually kind of neat-looking.

This one's at ISO 400 with my 85mm @ f/1.8, 1/2000 sec:


I'm wondering which one looks better. This one was at ISO 1600 with the 85mm at f/1.8 and 1/8000 sec. (I was kind of testing ISOs.)


I think the man stands out better in the second one, but I like the visible bank of windows on the first one --- I think it turned out better. Love the black and white conversion for these.

Some may say the "dark masses" on either side of the man are regrettable, but I like them. I think they, along with the B&W conversion, show a sense of isolation. Maybe I'm just trying to talk a crappy photo into being better, but it really does appeal to me.

As a side note, I tried out my sister-in-law's flash, and after reading my manual again, I don't think it works on my cam. Kind of a bummer. I also think I'll let my husband sell her 100-300mm lens. I might hold on to the 35-80mm for now.

Thursday, February 25, 2010

4 a.m. Project

I saw a link to the 4am Project on Twitter, and I think I might participate this year.

The idea is to take a photo at 4 a.m. on April 4th --- a "share what your 4 a.m. looks like" kind of thing.

It looks kind of fun, and I already have an idea about what my photo could be of. Though, funnily enough, April 4th is Easter this year, so we might be out of town since we'll have a day off. I might have to come up with a couple of alternative plans...

Monday, February 22, 2010

Hand-me-down photo equipment


My sister-in-law is getting rid of some of her older photo equipment (she shot mainly film), and she told me to take anything I might want. It's a couple of film cameras, a couple of lenses (only two fit EOS cams), a flash (Speedlite 200E), and a crap-ton of filters. I'm contemplating keeping one of the lenses, but right now I'm trying to learn about filters. (I know nothing about them!) So I listed them out here and am trying to figure out the main uses for each of them.

Some of them are color filters:

1. Tiffen 55mm 11 green 1 (not sure what this one does)
2. Promaster 52mm red (R2) (used to increase contrast in B&W photography and darken blue skies)
3. Promaster 52mm YA2 (orange) (used to increase contrast in B&H photography)
4. Quantaray 52mm Y2 (not sure what this one does -- it's yellow)

Others look like they might be more helpful:

5. Quantaray 52mm UV
6. Quantaray 55mm UV
7. Quantaray 55mm C-P.L. (I think it stands for "circular polarizer")
8. Promaster 52mm diffuser (used to achieve a soft-focus effect in commercial photography and portraits)
9. Promaster 52mm cross-screen 4x (used to achieve a 4-cross flare on bright light sources in photos, to achieve a softer focus)

...and two more, one cooling filter and one warming filter:

10. Promaster 52mm 81A (used to decrease color temperature [warm up colors], like on an overcast day with gray skies)
11. Promaster 52mm 80A (used to increase color temperature [cool down colors])

I read on this site that these cooling and warming filters (that change the white balance) are not really necessary if you shoot RAW files on a digital camera, which I do, so maybe I'll get rid of those two.

Too bad none of them are neutral density (or graduated neutral density) -- I might actually get some use out of one of those.

Otherwise, it seems that the circular polarizing filter is probably the most useful out of the whole list (if it fits any of my lenses). The site I linked to above has this to say about them: "They work by reducing the amount of reflected light that passes to your camera's sensor. Similar to polarizing sunglasses, polarizers will make skies appear deeper blue, will reduce glare and reflections off of water and other surfaces, and will reduce the contrast between land and sky."

The same site says that, "The effect [with the CP filter] is strongest when your camera is aimed in a direction which is perpendicular to the direction of the sun's incoming light." Very interesting. I'd like to give that a try. I'll have to see if 55mm is the right size for any of my lenses.

The red and orange ones (#s 2 and 3) also look intriguing --- I do like the look of black and white photography, so maybe it would be fun to give one of those a try. I'm not super-excited about them, though, because I feel like any effect they might grant to a photo can be done in post-processing afterward, and with less hassle (no filter to keep up with, attach, care for, &c.).

I might get rid of #s 1, 4, 8, 9, 10, and 11. Though it would be nice to figure out what the green and yellow ones (1 and 4) do before I sell them.

I'm hoping to have time to play with a couple of these in the next few weeks. Also will maybe try out the Speedlite, if it works. If I decide to keep either of the lenses, I'll post some details about that later, too.

Thursday, February 18, 2010

Newfound Lightroom skills

So, I'm posting one of the photos from my last post after some additional post-processing. I got some really good tips from the people in the Retouching forum on dpreview.com. I am really excited to be learning more about the program. I know it can give me great abilities -- I just haven't taken the time to really try things out. This photo gave me a good reason to.

So, here's my new edited version. One other thing I'd really like to do to finish it off would be to run it through some dedicated noise reduction software, but I don't have any of those programs (Noise Ninja, etc.). Ah, well.


I actually used the Mask tool to brighten the man's face and darken the plate on the wall right behind his head. I used Lightroom's noise reduction, but the beta only lets you do color and edge detail NR, not luminescence NR. I made the colors a cooler blue-ish tint. I could have lightened the photo more, but I like the shadows on the right side contrasting against the bright neon lights on the left.

If I have time this weekend, I would love to take some old photos and run them back through Lightroom to see if I can do better.

Monday, February 15, 2010

Night shots

I experimented a little with night shots last week. I had no idea what settings to use, so it was pretty much all trial and error. Here's one that I think turned out okay.

It was taken with my 85mm at ISO 800, f/2.8, and 1/200 sec.


I think the colors of the neon lights are interesting, and I'm hoping the man's face is light enough to be noticed. I think it is.

Here's another with the 85mm, at ISO 800, f/2.8, 1/50 sec:


I like the colors in this one, too. The lamp post in the foreground looks neat to me with the yellow and red casing.

And here's the uncropped, unstraightened version of it, which I include because I like the dark figure on the far right of the frame, and I missed him when I had to straighten/crop:


I wish I knew of a way to sort of copy-paste him back into the straightened version. I might ask on the retouching forum if anyone has any ideas. I think he adds a lot to the photo.

But anyway, I was actually quite pleased with these two since I hadn't really tried to shoot outdoors in these kind of lighting conditions yet. It was pretty hard for me to get anything that wasn't blurry, and these two are two of the three best. I scrapped almost everything else. Nothing I took of people walking by came out -- too blurry. I know the shutter speed was to blame for that, but I already had the aperture as wide open as I thought reasonable, and I wasn't willing to boost ISO to 1600, but maybe I should have been.

But I think they're not bad at all for ISO 800 on the 350D. When I zoomed in while editing in Lightroom, I definitely saw noise, but when looking at the photos "normal" size, it doesn't bother me -- I don't even notice it.

I think night images like these two are all fine and good with my current set-up, but if I ever want to get keepers of people in these conditions who aren't standing still as statues, I think I'm going to have to invest the time/$ in learning flash. I keep avoiding it because I don't think I'll be willing to carry around flash equipment all the time. I like photography a lot, and I like taking the kinds of images I take, but I can't see myself ever becoming the kind of photographer who carries around tripods and bounce cards and three bags' worth of equipment. I like being mobile and last-minute and flexible.

I like being the kind of photographer who happens to have her camera with her when she sees something interesting. And even when I'm with friends, I want to be able to pull out my camera and take a few shots without holding everyone up or exasperating them while I set up a tripod and connect a flash. Maybe that means I'll always be an amateur, but that's definitely okay with me.

I'm also afraid that my enjoyment of images like these has sealed the deal for me -- my next camera body needs to be awesome at high ISOs. I think I would get a ton of use out of that ability.

Friday, February 12, 2010

Canon AE-1 Program

My mom has been shooting digital for a while now, but I was reminded the other day of her old camera, a Canon AE-1 Program, bought in 1984 for $219. I can't remember if hers is black & silver, or all black, but at any rate, it looks like this:


I called her up and asked her if she'd bring it to me next month when they visit. She said she would, and I am so excited.

I'm interested in experimenting with it a bit because I've been thinking a lot about full-frame DSLRs lately, in all of my obsession about upgrading from my 350D. I have no idea what it feels like to shoot with one -- people talk about the DOF being better, etc., but I have a feeling that there's just a different kind of atmosphere about it that people like. And I remember my mom's pictures with the AE-1 Program looking so gorgeous, and not for any particular reason.

This isn't the best example, but it's one of the only ones I actually have on my computer --


About three years ago, I scanned in a bunch of our old photos from when we were kids -- I'm on the right, here, and that's my mom and brother.

What I would love to do with this cam is put in some black and white film and just take a roll of portraits. I just have this feeling that it's the perfect film camera for portraits. I also think it wouldn't be too bad at some landscapes. Ken Rockwell says to use it in "Program" mode (a.k.a. "professional," a.k.a. "auto"), which I believe is how my mom used it. It will be tempting to mess around a bit, though, and see what I can see, but now my photos will cost something, as opposed to the free digital images I've been so used to.

I won't have it in my hands until the end of March, but I'm doing some research now in preparation.

(And no, I haven't forgotten about my new 85mm. We're traveling this weekend, and I hope to find a few chances to use it the way I want to use it.)

Friday, February 5, 2010

85 1.8 arrived, testing

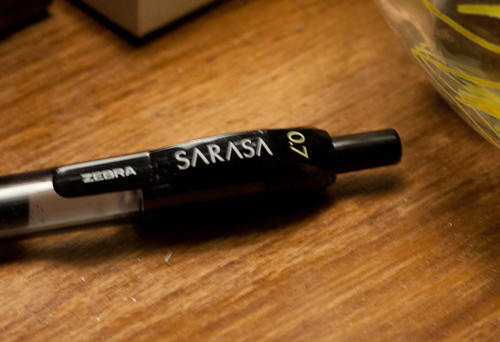
Right before our "historic" snowfall started -- the second one of the season already -- my 85 1.8 arrived. I've never really tested a lens before, and I don't usually read many in-depth tests of lenses myself, but I wanted to try this one out. So, I tested it for sharpness and focus last night at a few apertures between 1.8 and 5.0. All of the shots were at ISO 400. I tried to focus directly on the second (middle) "A" on "SARASA." All shots were hand-held, and these are small crops of larger scenes.

f/1.8, 1/125 sec:


f/2.0, 1/125 sec:


f/2.5, 1/80 sec:


f/3.5, 1/40 sec:


f/4.0, 1/30 sec:


As you can see, the image starts to get pretty fuzzy around f/4.0, but we're also looking at a significantly decreased shutter speed. I would like to do this same test outside, in sunshine, at ISO 100. Wonder what those results would look like. Thanks to The Great Blizzard of 2010 (not trademarked :)), it will be several days before I'm able to try a test like that.

At any rate, I'm extremely pleased with the sharpness at 1.8. The focus seems to be spot-on. I don't have a lot of experience evaluating lenses, and when I read about the problems people describe with new equipment on photography sites like dpreview.com, I get worried that I should test X, Y, and Z before being satisfied with the lens. But I consider "field use" the real test -- does it take the photos I want to take and perform as expected? Again, thanks to the arrival of The Great Blizzard, it will be a few days before I know the answers.

Meanwhile, on with testing ;)

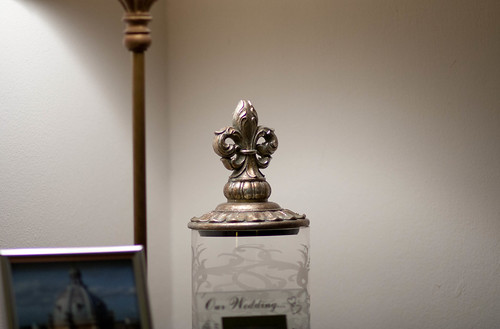
Here's one of the first shots I took after getting the lens on my 350D. It was taken at ISO 400, f/1.8, 1/250 sec:


And here's a small crop:


Now, the first thing I notice in this crop (other than the noise in the image thanks to the ISO) is a bit of what I believe is called chromatic aberration (CA) -- the purple coloring on the top of the piece, and anywhere the light is shining directly on it. The conditions for this shot were a little funky, as you can see from the full image above -- the container is sitting directly under a lamp, which is basically providing the only light for the scene. I don't know if that is contributing to the amount of CA I'm seeing here, or if this is a "flaw" of the lens at f/1.8 (and maybe the higher ISO has something to do with it?).

Anyway, the good news seems to be that it's pretty sharp (at least to my eyes). I believe I focused on the horizontal cross-piece, where the two "wings" curve around to. Considering the cropping I've done here, and the limited capabilities of my 350D's 8 megapixels, the image seems to be evidence of a sharp lens -- even at f/1.8.

I'm pretty pleased with my amateur tests, but I'm more excited to get outside and use it -- as soon as this snow stops!

Sunday, January 31, 2010

Second big snow

We had our second big snow of the season yesterday. Snowed all day, from about 9 a.m. until 5 or 6 p.m. Only accumulated maybe four or five inches, though. I went out this morning to take a few shots -- the sun is really shining bright.

I have re-decided (ha!) to get the 85 f/1.8. So I did a little DOF experiment with the tree branch below. I wonder which f-stop the 1.8 of the 85mm will be comparable to on the 50mm. I'm sure there's an equation that would let me figure it out, but adding 35 mms will probably mean that the 85's 1.8 will look something like the 50's 1.6, or maybe 1.4?

So the four shots below were taken in sequence, the first at f/1.6, the second at f/2, the third at f/2.5, and the last one at f/3.2:


Obviously I like the bokeh in the first photo the best -- I think it's pretty gorgeous, actually. However, I think the tree limb looks best in the third and fourth photos. If I were to try this again, I'd stand so that the limb was a little more parallel to me and take it at f/1.6 (or even 1.4) again -- that should keep more of the limb in focus, but still produce the lovely bokeh in the first shot.

The 85mm 1.8 is $379.95 (with free shipping) at B&H, which is probably where I'll buy it from. I ordered the 50mm from them, and it arrived really quickly. Seems that only L lenses come with hoods, which is kind of annoying. I know I should probably start investing in accessories like that.

I am also starting to slowly learn about filters and polarizers; we'll be at the beach this June, and I want to (1) keep my glass protected from the sand/salt, and (2) learn to take better coastal photos!

Sunday, January 24, 2010

Photojournalism, B&W

So, I ran across this website today about social documentary. I was looking at this photo series that a man in Illinois did on homeless people, all in black and white, and I was thinking that I needed to experiment more with B&W.

Usually I love the look. I think I read once that B&W is a good treatment to use if the color in the color version doesn't add anything to the story (or maybe is not particularly exciting). I also think B&W treatment adds a certain drama to a photo, but that's not to say that color photos can't be dramatic, because they absolutely can, of course. I would also hazard to guess that good B&W landscapes are fewer and further between than good B&W portraits, still life, etc. I'm sure most photographers would say that they consider applying B&W on a case-by-case basis.

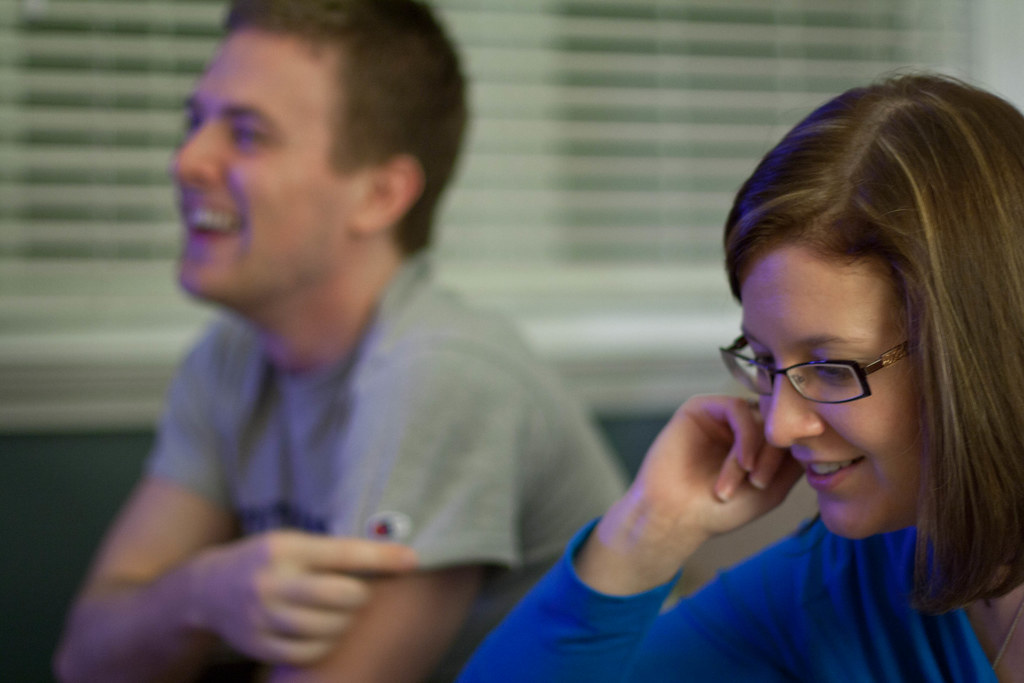
I happened to take a few photos of my friends the other night at their house (they may soon resent being friends with me if I keep posting photos of them!) that I thought looked better with a black and white treatment. But I'll also post the color version for comparison.

B&W:


And the color version:


I liked B&W better for this photo for several reasons:

1. The color doesn't add anything.
2. In fact, I think the color detracts from the photo, partly because of that purple-ish TV glow resting on them.
3. I think M stands out more in the foreground in the B&W version.

I also want to experiment with treating some street photography in B&W. I'm thinking I might find it more appealing that way. There's something about a random street scene in color that looks like, well, a random street scene. For some reason (and I feel like this might be the mark of an amateur...?), a B&W street photograph looks more intentioned. Like it was meant to be.

Monday, January 11, 2010

First try at street photography

I took the metro in to see my cousin on Sunday. I took my camera and went with the intention of forcing myself to try some real street photography -- candids of people in the street, store fronts, etc. But it was so freezing outside that I could barely walk from one building to the next without my fingers falling off (had on the fingerless gloves to leave them free to manipulate camera settings).

So anyway, I compromised by taking some photos in the metro. Here's one of the only shots I took of actual people -- there's something intimidating about photographing people that you don't know at such a close distance. It'll take some getting used to. It's at ISO 800, f2:


It's a reflection in the window. I then saw an even better composition, from directly behind them, and moved back a row of seats to get the entire scene in the frame, then someone promptly sat down right behind them -- in the way. Guess that's another peril of street photography. Bummer.

I enjoy looking at street photography, so I'm going to try my hand at it again when it's not so cold outside. I'll probably take my camera with me to work occasionally and try some shooting down in Old Town on my lunch break or something. I anticipate Old Town being quite a lucrative location. We'll see. First I need to see some temperatures above freezing!

Thursday, January 7, 2010

DOF, AF systems

I have somehow just gotten the ability to change the size of the images I post in here. I won't ask questions; I like it.

Went out for Italian with some friends from one of my study abroad groups back in undergrad. This is a photo of our appetizer, before it was completely devoured, taken at f/1.6, ISO 800:


I really like this shot (if I do say so myself, ha). I think the colors are good, and the addition of the hand & fork in the background is awesome. The lighting provided some nice highlights, but still fairly detailed "low lights." I'm pretty pleased. The f/1.6 didn't add a bad effect either ;)

This next photo is one of a series of three paintings we have above our couch. I was hoping that the DOF would look a little shallower, but I think I was coming at it from too straight of an angle, if I had shot at an upward angle from even lower, I think I would have seen more blur. But it's still cool. I do think the colors turned out particularly well. Does it have a greenish tint, I wonder? I try to be careful about that. This is at f/1.4, ISO 800:


The DOF looks a lot better on this photo. Also f/1.4, ISO 800:


I know lots of people take this boring "keyboard DOF" shot, but I had to try it.

My main interest when shooting these few shots was to see how the different AF focus points reacted -- I've been reading up on Canon's AF systems (not specifically the one in my camera, since it's a discontinued model). The center point is supposed to be cross-type, while the others aren't. I can't really exhibit these differences in the shots, but I can say that it was usually much harder to lock focus when I was using a point other than the center one.

I don't mind (technique-wise) using the center point every time and simply recomposing, but I wonder if recomposing can actually throw off the focus in some instances.

I'm particularly interested in this because I've become interested in the 5D Mark II as my body upgrade, and it seems that the only big complaint about that body is the "adolescent" focusing system --- still only the center focus point is cross-type (and high-precision).

Supposedly the cross-type focus points are most particularly helpful when tracking moving subjects (birds in flight, sports), which is why people are so excited about the 7D's focus system. But I really, really, really want a full-frame body. I wish the 5D2's AF was just a tad better. Ah well. We'll see what Canon announces in February. Maybe one of the new bodies will fit me better (at what cost?!).

Tuesday, January 5, 2010

RAW, ISO, landscapes, Part 2

So, I tried everything on my list from the last post except for experimenting with DOF.

1. Shooting in RAW: This was an adventure. I realized that when I opened the images after they had downloaded to my computer, that automatically triggered the opening of DPP (Digital Photo Professional), where I could edit the RAW images and convert them to JPEGs. DPP lacks some of the editing tools that I commonly use, especially the "straighten" tool, so I had to also open the photos in my beta version of Lightroom that I got a couple of weeks ago to finish up the editing. Had a heck of a time figuring out how to convert the edited RAW images from DPP to Lightroom to JPEGs in a folder on my desktop, but I think I get it now.

In shooting RAW, I noticed that my images were rougher around the edges (literally and figuratively) than I'm used to. I am still figuring out which setting to tweak (& how much) to get a smoother, less noisy image. However, I think I'll continue to shoot in RAW and learn how to manipulate the images to get a good final product.

2. Higher ISOs: I shot a few landscapes in ISO 1600 without meaning to, but it ended up being a good experiment (photos posted below). I also shot a series of J inside the house on ISO 100 through 1600. You won't really be able to tell a difference at the size they post to on this site, but zoomed to 100% you can definitely see a difference in the smoothness of the bokeh. I shot them with my 50mm. Unfortunately, with my XT, the images get fairly noisy at ISO 400, and pretty noisy at 800. So that's definitely on the top of my list for my next body upgrade.

3. Landscapes, large apertures: So, I slapped on my old kit lens and tried out a few landscapes. All of them were taken at my widest angle, 18mm, which is actually 28 on my crop body. For this one, I set the f-stop at 7.1 and ISO 800:


I think I maybe should have tried an even higher f-stop number. Here's another that I converted to black and white. Also f/7.1, but at ISO 400:


There was an intense fog that passed through the area in the late morning. I was technically working remotely via my laptop that day, but I had to take a break for a few minutes and try to get some shots. The fog was so unreal.

Another interesting fact about the above photo was the straightening I applied to it. As I took it, the photo was actually pretty straight (vertical) when looking at the tree on the left side of the frame. However, the horizon was really off, tilted up on the right side. So, I tried to straighten the horizon, but then the tree looked like it was leaning to the right, in toward the middle of the frame. So I tried to strike a balance, but I'm wondering what landscape photographers usually do in that situation. What should be straight, if only one element can be?

Here's one last one. F/7.1, ISO 400:


It was a challenge messing with the colors in post-processing. The fog really threw me off, and I wasn't sure how saturated to make them -- how "colorful" to make them -- considering the intensity of the fog. I don't want the photos to look unnatural.

It was pretty fun shooting landscape, and I think I have a fairly good eye for its composition. I think finding interesting locales where I live (big city) would be more challenging than anything!

Look for an updated "Wish List" to come (it's getting more expensive).

Wednesday, December 30, 2009

RAW, higher ISOs, landscapes

We'll be traveling again this weekend, and I plan to use the time off to experiment with a few more things on my XT.

1. Shooting in RAW. I keep forgetting to try this! It may actually take a quick look in my manual to learn how to change over to RAW format.
2. Higher ISOs. I tried ISO 800 over Christmas, which I think could have given pretty excellent results had I some good noise-reducing software (need to look into prices for that). But I'd like to also try 1600... "just to see." I'm curious!
3. Landscapes at large apertures. It's been several months now since I've really given thought to shooting with my old kit lens. Since it has the widest angle of the two, it's my only option. One reason for experimenting with this is to see if I would really get some use out of an ultra-wide-angle lens (like the EF-S 10-22). Another reason is to see if there's any way I could justify a full-frame purchase (a used 5d is the only one I'd be able to get my hands on).
4. Shallow DOF. Another experiment that could partly justify a full-frame purchase. Also, it's cool!

Results to follow.

(It's nice having this free time to use for photo experiments -- otherwise it'd be for schoolwork, likely!)

Friday, December 18, 2009

dpreview.com, flash

This shot of Mer from the last post ...


... could have been much better if I had utilized some flash equipment.

I am learning so much. And I have found my place on the web. The forums at dpreview.com have already helped me immensely with decisions about gear and post-processing techniques, and of course all of the reviews are really nice. I've made a wish list, which is probably a bad thing. In order (I think):

1. EF-S 10-22mm f/3.5 (goes for about $720 on Amazon now)
2. an upgraded crop body (details below)
3. EF-S 17-55mm f/2.8 (going for about $990 on Amazon now)
4. a longer zoom (this is so far in the future that I'm not spending time thinking about it now, ha)

I've pretty much decided that I'll stick with crop bodies for a while. Full-frame bodies are expensive, heavy, and offer advantages that I'll probably not even use (at least for many years, if ever!). Though the one thing that appeals to me about them is the fact that the larger sensors mean that those bodies perform better in low light. However, I think I can get more than adequate performance with crop bodies, good lenses, and the right exposure settings, so saving money by staying with crops is definitely the plan.

I'm interested in the 50d and 7d now, but if they come out with a "60d" (thanks, canonrumors.com) in the next 6-8 months, that could be a definite possibility. My must-haves are:

1. excellent ISO performance at higher ISOs
2. at least 10-12mp (which pretty much all cameras have now)
3. an improved AF system (read about some problems with the 7d here, which is no good)

Also, to go back to my first point about the photo of Mer ... I obviously need to invest some time and money into learning about flash. Most will say that the on-board flash is useless in almost all situations, which I tend to agree with, unless of course you're shooting on Auto and just want a quick snapshot to record something specific. So, that means I'll need an external. Speedlite? Much more research to do in that dept., and some equip. there should definitely be on my Wish List.

I should have named this The Blog About How I Spend All My Money.

Over&out.

Tuesday, December 8, 2009

Sharper

So, the white balance is off in the images from the last post. But I'm too lazy to post the color-corrected versions.

Also, here's a shot at f/4.0, ISO 200, with a much faster shutter speed. The sun was shining in through the windows Sunday morning after all of the snow we got on Saturday. The cat in the background is just an added bonus -- she walked into my frame! Guess she has a little bit of "diva" in her after all ;)

Talk about tack-sharp! I'm pleased.

Wednesday, December 2, 2009

New lens: Canon EF 50mm f/1.4

The lens has arrived. I got a chance to take a few shots of one of our foster cats tonight. One disappointment in these photos is the lack of sharpness I thought I'd see. However, I think that's because the focus is off in both of these, and I think that's because I had the lens wide open. I did read in reviews that it's a little soft wide open. I think it was also having trouble focusing because of all the fur, the whiskers, etc. I was pretty close to her, too.


Neither of these shots really highlight it, either, but the bokeh with this lens is, as advertised, amazing. I can't wait to get it in some different conditions and see what it can do. I hope to have a much better handle on these indoor, low-lit shots by the time Christmas is here so I can take some good photos of my family.


On another note, kitty is cute! More from this lens soon...

Wednesday, November 25, 2009

New lens

Well folks, I've found the next lens I want to invest in.


This is the Canon EF 50mm 1.4 USM. And it's perfect. I would "ask" for it for Christmas, but I want to be able to actually use it over the holidays (after having some time to get used to it), so I'm hoping to find a sweet Black Friday deal this weekend. The sample images I've seen from it online are just heavenly.

For example, this one, taken from the customer images page on the Amazon page for the lens:


I think that's all that really needs to be said.

I am always complaining that I can't take good photos at Christmas when we're all in Gran's living room opening presents. And that's because the living room is lit with warmest light from six different not-very-bright lamps all joining forces. My photos from past years are almost always blurry and not well-lit. Almost every single person who's reviewed this lens says that it's great in indoor, low-lit situations. That's exactly what I need, which is why [I guess] I'm willing to shell out the $300-something it'll cost for it.

Crossing my fingers for a sweet Black Friday deal...

Sunday, June 7, 2009

Blackberries, white balance

So, I figured out why my photos from last weekend were blue-tinted. I had the white balance set for fluorescent lights! I'm such an idiot. We went for a little walk yesterday, and after I figured that out (with the help of cheating off the Auto settings), I finally switched to "daylight" and was good to go.

The Auto setting is actually really helpful for that. While I'm learning, it's nice to be able to see what settings are chosen for the Auto setting, then that gives me an idea of what numbers I should play around with on Manual. I learned that when there is more sunlight, the F-stop should be somewhere around 12, 13, or 14, with an ISO of 250, 320 (I think -- trying to remember!), and when you're in the shade, or if the sun goes behind clouds, the F-stop is better set somewhere between 7 or 8 or so.

I don't have an excellent example of the difference because I only uploaded the better pictures. My EOS Utility function seems to have developed a glitch -- it freezes up after a certain amount of time, so I have to upload 28-30 photos at a time, shut it down, then start it up again and upload another batch.

But anyway, here's a photo of a blackberry tree branch at F-stop 16, ISO 400, shutter speed 1/500:


Here's a similar shot at F-stop 13, ISO 400, shutter speed 1/320:


We found this blackberry tree(?) behind the elementary school -- I'd only ever seen blackberry bushes before, so that was interesting. That dark mass on the right side of the puddle in the photo below is blackberries. Most of the ripe ones had already fallen, but we still picked a few.


Tried a few shots on the macro setting, but I haven't worked with that a lot yet, so they don't look too exciting.


I'm eager to get these basics down so I can spend more time using the settings in interesting ways to create effects. But this weekend was a breakthrough, haha. When we went into Maggie Moos to get ice cream, I took some photos of the ice cream cones and tubs, but I forgot to change the white balance to an indoor setting. None of those photos turned out very well. Sigh. But I guess my lesson has been learned: Always check your white balance ;)